
Applicant Records
You can use Word Templates that include the merge field “CV Text” to create formatted CVs. In addition to the “CV Text” merge field a number of other merge fields from the applicant record can be included such as name, ID number, summary, work preferences and much more. As these are word templates you can also add branding, for example in the header and footers.
Once the template is created it can have an applicants CV Text merged into it to create the formatted CV. This can be done from the applicants Formatted CV tab, at the point of Submission or Marketing the applicant.
For more information on creating these templates please see the article Word Templates.
For more information please see the article CVs | Original & Formatted.
itris will treat the PDF document the same as if it was in a Word format, the only caveat to this is that the PDF documents must not be scanned copies.
Please see the CVs | Original & Formatted article for more information.
Currently, the best way to record a lead (for example for a potential new job or client) is by adding a comment.
You may wish to create a specific Comment Category in the IMU under Data | List Items for Leads, so that you can use the Comments Report to report on leads taken.

Under the Additional tab of an Applicant record is a field called National Identifier which can be used for an applicants National Insurance Number.

However, if you wish to be able to search on this information, or link it to compliance you may wish to create it as a Custom Field. Please see the Data | Custom Fields article for more information.
The date on the reference is there to indicate the dates the reference covers, and in most cases this would only be up to the date the reference was given (it would not cover future dates).
Please see the References article for more information.
Company & Contact Records
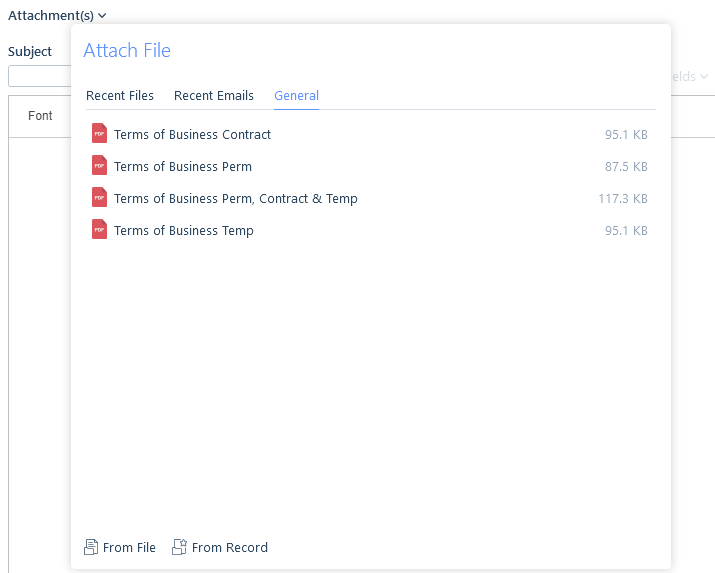
You are not able to set it so that your company terms are attached by default to emails sent to Contacts or Companies. However, you can create either Personal Email Templates or Global Email Templates which can have your terms attached to them. Alternatively, if your terms are saved in the IMU you can attach them to emails via the Attachment(s) > General tab.
See the Settings | General Settings article for how to save your terms in the IMU.
There are a couple of options you have and may wish to consider when a contact has left a company.
Firstly, you might have a Contact Status list item for Left Company that you can update the record with. Contact Status list items can be created in the IMU under Data | List items.

Additionally, you may wish to add an end date to the Contacts record under the Additional Tab.
If the contact has moved to another of your clients you can move use the Moving Contact functionality to link the records, which will then show on all the linked records.
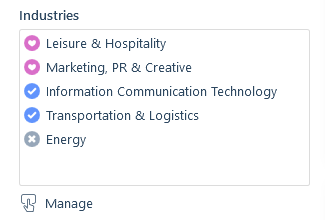
The Recruits For field is available on both Company and Contact records as a way of indicating by category the type of roles that company or contact Recruit For.
For example jobs such as Brand Journalist, Blogger, Column Journalist, Photo Editor etc, might be categorised under Journalism.
The Recruits For list is the same list shown under Job Function on an Applicant record.
This list is managed in the IMU under Data | Lists Items.
This differs from Keywords on Company and Contact records that might for example be used on a company record to indicate they type of work they do, and on a contact record to indicate the skills that contact has.
Compliance
Yes, compliance can be configured on jobs and there is a compliance management area to check and administer the status of submissions to jobs as well as placements.
Additionally, Applicant Compliance can be set up to monitor compliance outside of jobs and placements.
Please see the Compliance articles for more information.
No, itris does not currently have functionality to send reminders in relation to certification expiries.
However, if these are set up as part of Compliance then they can be tracked via the Compliance Management area.
Please see the Compliance articles for more information.
Alternatively, you can run regular searches for Date or Date Range Custom Fields by expiry date, please see the Custom Field Searching article for more information.
Dashboard & Reporting
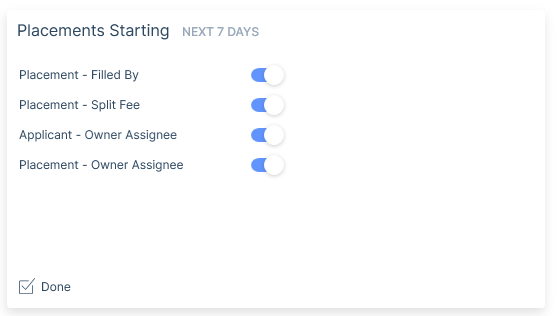
Yes, you can configure both how the widgets are displayed and which criteria your widgets use.
From the Configure Widget button at the top of the report you can set which widgets are displayed in your Dashboard and if they load in overview or list view by default.

Using the configuration icon on each widget you can choose the criteria for which records/activity will show. For example, for Placements starting you can choose to show any combination of placements filled by you, where you have a split fee, where the applicant or placement is owned by you.
You can adjust the order your dashboard widgets are displayed in by dragging them into the required order when viewing your dashboard.
Additionally, if you have permissions to do so you can view the Dashboard for your whole team or another user.
Please see the Dashboard | Active Business Intelligence article for more information.
Email & Communication
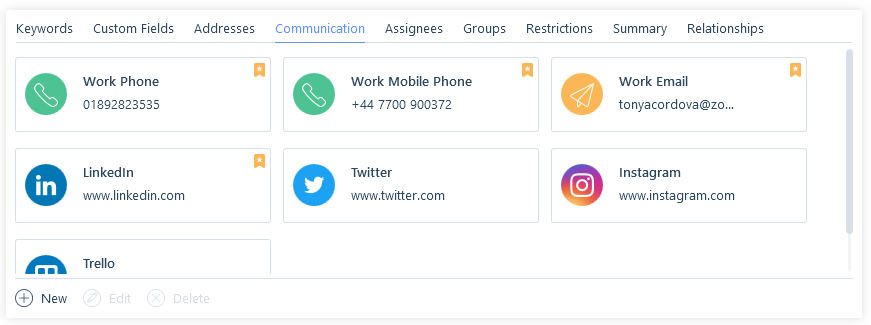
Yes, additional contact details can be added to the Communication tab on Applicant, Company and Contact records.
Please see the Communication Assignment article for more information.
Terms cannot be attached automatically. However, when sending an email you can attach any documents saved on a record, or from the General tab attach standard terms if they have been saved within the IMU.
Please see the Settings | General Settings article for more information.
To go back to an open email if you have navigated away from your itris emails you simply click the email button in the Navigation bar. This will take you back to the email window and all your open (in progress) emails.

If your emails are not sending, first thing to do is check the status bar in itris (bottom right). Do you see the warning icon next to the Outlook icons?

This could indicate an issue with your configuration. Go to your itris Preferences to check your settings. You may need to close and re-open Outlook after updating your configuration.
Also, check your Outlook Sent Items and Outbox. itris’ job is to send your emails to your Outlook, once there Outlook takes over and that’s a job for your internal IT.
If the emails are not in your Outlook Sent Items or Outbox please set in touch with the itris helpdesk via [email protected].
Yes, when sending a bulk email from a search or a group you will be presented with a semi-modal telling you who and why the recipient is excluded.
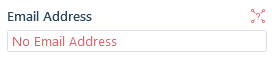
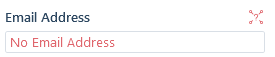
If you would like to have a list of the records without an email address, in order to enter them, we would suggest editing your previous criteria to only include those that have no email addresses.
Please see the Searching Introduction article for more information.
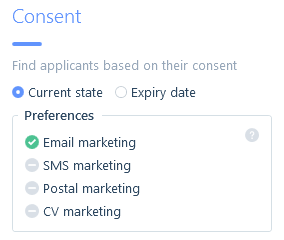
When running your initial search you may also find it useful to only include those applicants/contacts that have opted-in to email marketing. This way those that have not opted in won’t be returned.
Please see the Applicant Searching or Contact Searching articles for more information.
This is most likely because the phone type (e.g. mobile) has not been set up to Receive SMS, this can be set in the IMU.
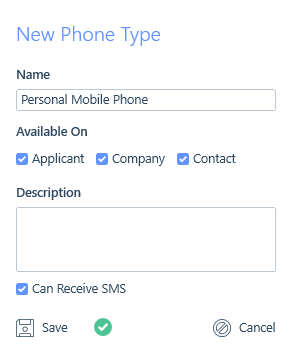
Please see the Data | Communications article for more information.
Jobs & Placements
If you are aware that an applicant you have placed in a Permanent placement has left you can add an end date to that placement (aka unbook the placement).
Beneath the Start Date on the Placement is the End Date field. By clicking on the field header (e.g. the words End Date) you can use the date picker to select the end date (this must be a date after the start date).
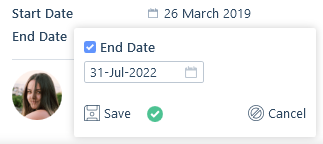
Once the end date has passed, the placement will be closed.

Unfortunately you cannot change the work type of a job or placement once it has been created (e.g. converting a temporary job to a permanent job), you will be required to create a new job/placement.
You can however duplicate a job from the action bar of the job record to save you entering much of the same information again.

Please see the New Job article for more information.
Yes, you can make Quick Placements from Applicant, Company or Contact Records via the Quick Place button in the action bar.

Please see the Quick Placements article for more information
To reopen a closed permanent placement click on the End Date field and remove the End Date tick.
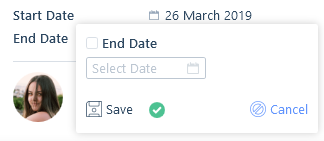
To reopen a Temporary or Contract Placement either click on the End Date field and add a future End Date, or use the Extend button in the Action bar. Please see the Extending Placements article for more information on this option.
In the Action Bar of the Placement Record you will find the Close button.

Upon clicking this you can add in the end date of the placement, this will need to be a past date.
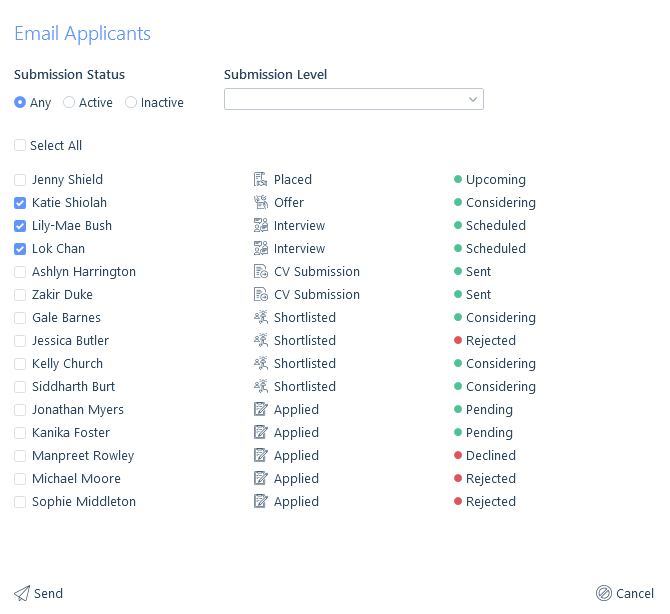
In order to email applicants from a job you must ensure they have been added to any one of the submission levels (e.g. application, shortlist, CV submission, interview, offer, placed). Then from the Action Bar click on Send Email and choose Applicant.
In the Email Applicants window that opens you can filter and choose the applicants you wish to email.
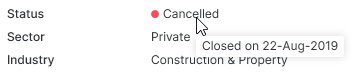
When a job has a closed status such as “Filled by Us” you can hover over the status for a tool tip that displays the the date the job last transitioned from a ‘Live’ status to a ‘Closed’ one.
You can only extend placements that have an interval charge e.g. hourly\daily, and you will be able to extend from the action bar of the placement record.

Once you have added an extension you will have an additional Extensions tab within the Details area of the Placement record, where you will be able to add additional extensions if you wish.
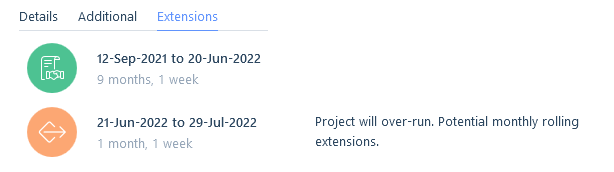
Please see the Extending Placements article for more information.
From the Action bar of the relevant placement you can set it as Did Not Start. This will close the placement and remove it from any financial reports etc.

Setting a placement as Did Not Start will record on the job record for you to keep track. Once you have confirmed, the role will become available again on the job (if there was only one role for this job, this will automatically open to one role again).
You will not be able to reopen the placement to place another applicant into it, as each applicant has their own placement record. Once you find another suitable applicant, place them into the job and that will create a new placement record for you and record accordingly on the Job record.
Please see the Placement Record article for more information.
You can either change the end date on the placement or you can use the extend button in the action bar to extend the placement.
Once a new end date has been added the placement will then reopen.
Please see the Extending Placements article for more information.
Absolutely, you have a few options of how you could do this.
Live Placements area
Live Placements allows you a holistic view of Upcoming, Working and Ended (Open) placements, that can be filtered by users, teams, companies and more providing great flexibility around the data you wish to see.
See the Live Placements article for more information.
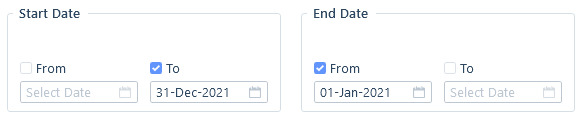
Temp/Contract Workers out via a Search:
In a placement search first set any non-date criteria needed, such as work type.
The date part is best described using an example; say we are looking for anybody that worked in 2021 (you could run this by previous/current/next week and so forth).
Under Start Date choose TO and add in 31.12.21 as we want to find only those who started before the end of the year. Then, under End Date choose FROM and add in 01.01.21 so that you are not including workers who finished before the year started.
Run the search, the results will then show you anyone who worked at least 1 day during the year.
Temp/Contract Workers out via the Income Report:
Though the purpose of the Income Report is to show you total estimated value based on the date range filtered to, the results are also therefore reflecting the Interval payment workers (such as temp and contractor workers) in that period, as they would have to be working during that period in order to register as income. See the Income Report article for more information.
Temp/Contract Workers out via Dashboard:
In your Dashboard the Workers Out widget shows you your interval charge placements (such as temp and contractor workers) working per day over the next 7 days. See the Dashboard | Active Business Intelligence article for more information.
Miscellaneous
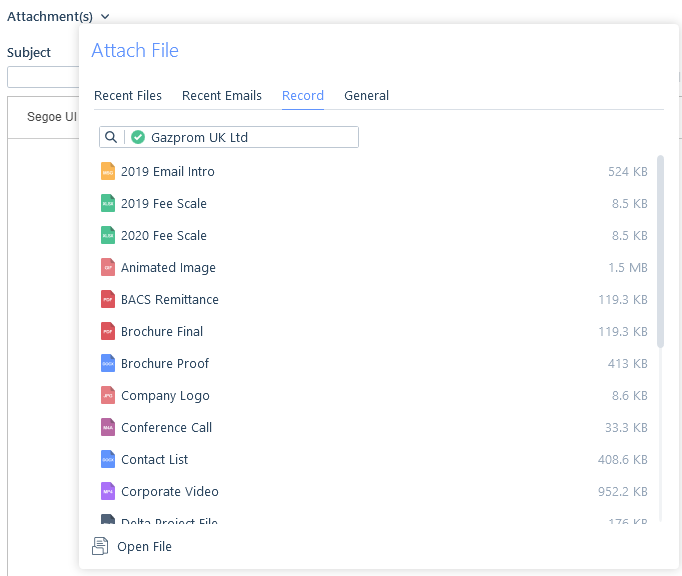
Below each record’s name banner is the attachments tab.
From there you will be able to add a variety of attachment types including images, videos and zipped files.
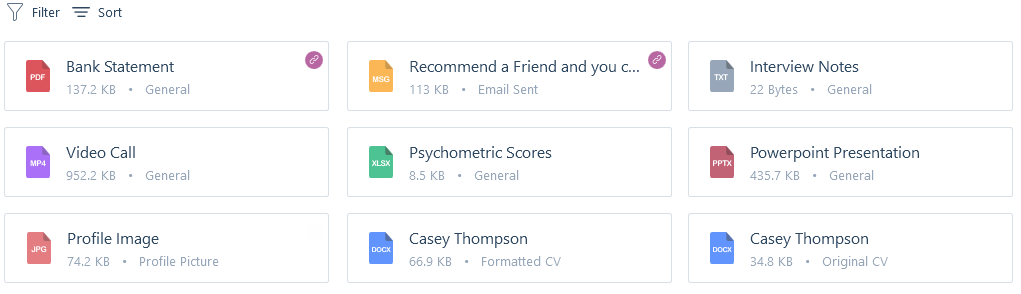
There are a number of action buttons at the foot of the screen, and from here you can add in New attachments from file or from one of your word Templates. Additionally you can edit the properties (e.g. name, category, links etc) or edit the attached file itself.

Attachments will need to be uploaded individually, we don’t currently support bulk uploading.
Please see the Attachments article for more information.
You are not directly able to create address labels from itris, however if you have the list of recipients in a search or group you can export this list to excel and use the excel document as the source file for creating address labels via Microsoft Word’s Mailings functionality.
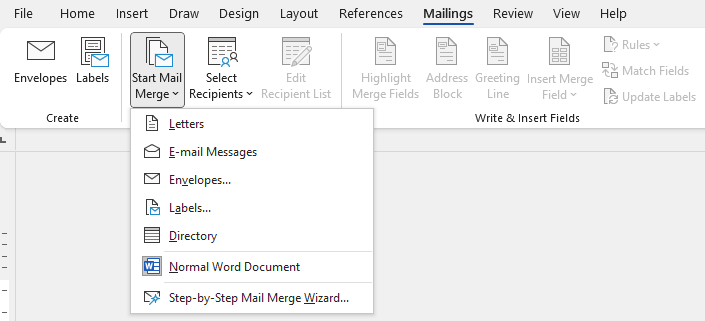
When exporting from itris, make sure to include the address column. Please see our Data Exports article for more information on exporting from itris.
Printing records, forms, reports, searches etc from itris is not possible, this is to protect your data. However, if you have permissions to you are able to export Search results and Reports to Excel and print from there.
Please the User Management | Permissions article for more information.
In a number of places such as reports or submission lists you can set filter defaults to save your settings for each time you run the filter, saving you time.
Please note that date ranges won’t be saved as part of the defaults (please relevant articles for each report for more information on default dates).
If you change your filter settings you can easily return to your default settings by using the Reset option.
Yes, but you will need a VOIP enabled phone system with the relevant software application is installed on your network/pc. Then by clicking on the number you want to dial the app should open and start the call (auto dial).
The first time you use this functionality you may get a windows pop up asking you which application to use, and from here you can select the relevant software (we suggest ticking Always use this app so that you don’t get this pop up again). This then connects to the software for click & dial.
We recommend the following screen display settings where possible, as these may help with the size of itris on your PC monitor:
- Scale set at 100%
- Display Resolution at 1920 x 1080
Note, such changes will affect how all applications are displayed on your computer.
These settings are located on windows PCs via, Start > Settings > System > Display.
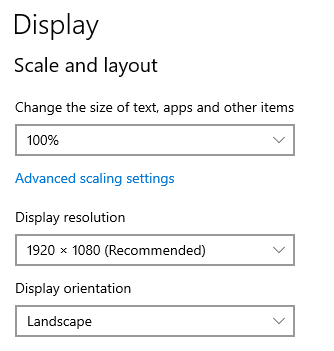
If you are on a remote desktop session, these settings need to be set outside of the Remote Desktop.
However, if you do want itris to appear zoomed in then you can of course increase the percentage setting shown above.
Additionally, the containers within a record (the parts where the record data shows) will be displayed vertically. You can reorder these should you wish, please see the itris Preferences article for more information.
When it comes to recording the created or modified date/time of activity (e.g creating records, adding comments, submitting CV’s) in itris what is recorded is Time Zone aware.
To demonstrate this, if you have a user based in New York who adds an applicant record at 9am local time (EST), a user in London will see this as created 2pm (GMT), a user Berlin will see this as created at 3pm (CET), and a user in Tokyo will see this as created at 11pm (JST).
API’s and Webhooks are similar functionality in that they communicate data between platforms, however there is a key difference between them.
With the API itris provides endpoints that allow 3rd party applications to read, create or update data in itris.
However, with Webhooks itris sends data to the 3rd party when triggered by an event in itris.
Records General
Bulk Actions are available via Searches and Groups for main records and the following data can be actioned:
- Access Group - Applicant, Company & Contact records only, Assign and Remove options
- Assignees - all main records, Assign and Remove options
- Comments - all main records, Add comment option
- Keywords - all main records, Assign and Remove options
- Status - Applicant, Company, Contact and Job records only, Assign only
Please see the Bulk Actions article for more information.
Additionally, bulk actions are also available in the following places:
Scheduled Calls - bulk mark calls as completed, see the Scheduled Calls article fore further details.
Live Jobs - bulk close live jobs, see the Live Jobs article for further details.
Live Placements - Extend, End Early or Close live placements in bulk, see the Live Placements article for more information
When creating New Applicant and New Contact records, when clicked, the magnifying glass icon next to their name will load a LinkedIn Search for them in your default browser. You can then view their profile and use any relevant information to complete the record. For example, you can drag over their LinkedIn picture to be their itris profile picture, drag and drop (or copy and paste) the LinkedIn About information into the Summary tab or for applicants simply cross-reference their employment history.
For Applicant, Company and Contact records that have a LinkedIn URL saved in the Communications area a website icon for that URL will be displayed at the top of the record.
All records contact details (including email, telephone numbers, web address and social medias) can be edited from within the Communications tab on the Applicant, Company or Contact record.
Please see the Communication Assignment article for more information.
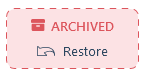
Applicant, Company & Contact records can be archived using the Archive icon in the top left of the record.
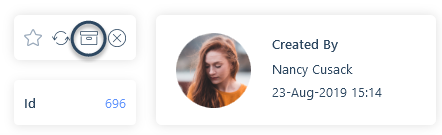
Once a record is Archived the Archive banner will display, which is also where you can unarchive/restore a record should you wish.
When a Company record is archived, all unarchived Contacts at the Company will also be archived. If the Company record is later restored then all Contacts that were archived as a result of archiving the Company will also be restored.
Jobs and Placements can’t be archived, but they can be give an inactive status or deleted.
Please note that archiving and restoring is permission based.
All record types (Applicant, Company, Contact, Job and Placement) can be deleted, but you will need permissions to do so. Please see the User Management | Permissions article for more information.
On the record that you wish to delete click the Delete icon in the top right corner above the record ID number.
If there are any associated records to the record you are deleting you will be warned that these records will also be deleted. For example, if you are deleting a company with Contacts, Jobs and Placements against it.

Depending on your reasons for deletion, for Jobs and Placements you may wish to consider alternative functionality which means the record remains in existence but is not active. For example, you might change the status of a job to an inactive status such as Cancelled or Filled Elsewhere (see the Data | List Items article for more information). When it comes to Placements, if you have a scenario where the placement was made, but the applicant Did Not Start you can use the Did Not Start button in the Action Bar to close the placement (see the Placement Record article for more information).
Depending on what it is you want to edit there are different steps to take. For example, in lots of areas such as a Contacts Job Title you can click on the field name to edit that piece of information.

In other areas such as Communication, CV’s, Employment you will have New, Edit, Delete action buttons.

Areas such as Keywords, Custom Fields, Applicant Work Preferences you will have a Manage button.
Please see the following articles for more information.
Currently only Company Records can be merged, see the article Merging Records | Companies.
Unfortunately, it is not possible to merge Applicant, Contact, Job or Placement records in itris. If you find you have duplicate records we suggest using the Archive functionality to archive older records, and perhaps add a quick note to direct people via the record ID number to the appropriate record. See the FAQ above for more information on Archiving.
Searching
Absolutely, this is called Negative Searching (AKA Null Values).
You simply just click on the criteria’s label to toggle the null value search, which turns the label red and display a watermark inside the control.
You can use this on most, but not all, fields.
Please see the Searching Introduction article for more information.
You are only able to link an applicant search to a job record, this is essentially sharing that search allowing all users to have access to it. To link a search to a job you must save the search, you will then have the option to link the search to one or more jobs. Once saved, you will be able to locate the search from within the Submissions area of a job record.
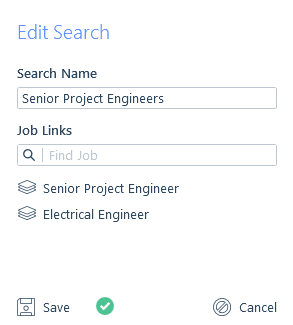
Please see the Managing Saved Searches article for more information.
You can hit Ctrl + F on your keyboard, this will then navigate you to the Record Find Control in the top right of your screen. Here you can search for all record types by name, known as or ID number. If the record you are looking for is not listed, or you are not sure which record it is you can go into the Advanced Record Find to see more results or add in further criteria.
Please see the Record Find Control article for more information.
You have the ability to mark records with coloured flags.
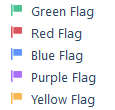
To save you time, each flag has a keyboard shortcut. You can find these within the tooltip located next to the flag button.
Please see the Managing Search Results article for more information.
The information panel at the side of the search results has a tab where you can see the 30 most recent comments. See our Managing Search Results article for more information.
Also, via the action buttons of search results (any record type search), you will notice you can Pop Out the search results. This will pop the results out into another window that you can resize and move around, allowing you to view the record and see all comments. Please see the Managing Search Results article for more information.

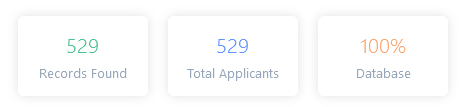
If you want to find all your applicant records for example (same goes if you are looking for all your company, contact, job and placement records) then the simplest search to do is use the Create Date.
First ensure all other criteria is cleared, including any criteria that may have been loaded from a default search template. You can use the Clear Criteria button for this.
Under Date Ranges > Created By tick End Date and choose today’s date from the date picker.
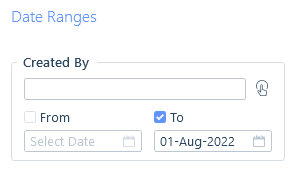
Run your search and in the top right of your results you should see that 100% of results for that record type have been returned.
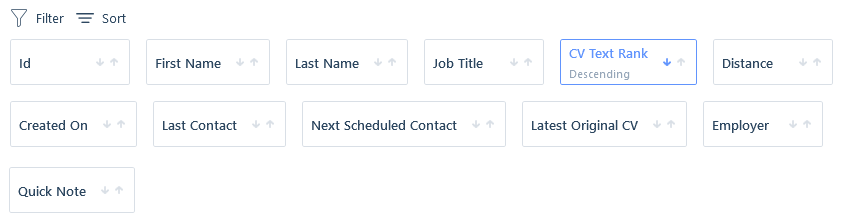
Generally, search results will be returned in Created On date in descending order. However, if you have included CV Text (Boolean) and or Geolocation criteria this will affect the order of the results.
- If you have included CV Text (Boolean) criteria the search results will order with the highest-ranking (best) applicants at the top.
- If you have Geolocation criteria (but not Boolean) the results will be ordered by distance, with the closest applicants at the top.
- Searching on both CV Text (Boolean) and Geolocation criteria the search results will order with the highest-ranking (best) applicants at the top.
Your results order can be changed via the Sort option.
Please see the following articles for more information.
Full Text (Boolean) Searching article
Managing Search Results article
This will depend if/what other criteria is added
These will be returned by Created On date in descending order, however you have various sort options that you can apply to your search results.

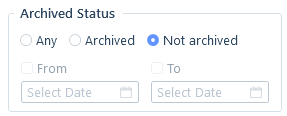
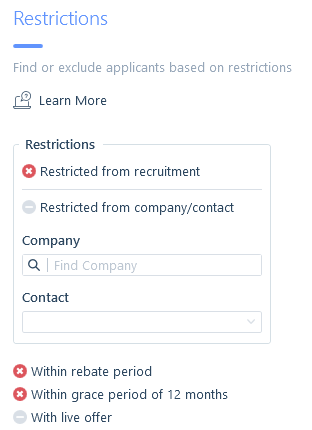
By default, itris will bring back all records that match your search criteria, this includes archived applicants, applicants that are restricted, placed applicants, those within rebate period etc.
We advise that you create your own search template which excludes archived applicants and any other criteria such as those listed above that you feel is relevant. You may then wish to set the template as your default search criteria.
Here are 5 search criteria we recommend including as part of your (default) applicant search template.
1. Exclude archived applicants
2. Exclude your currently working Temps and Contractors
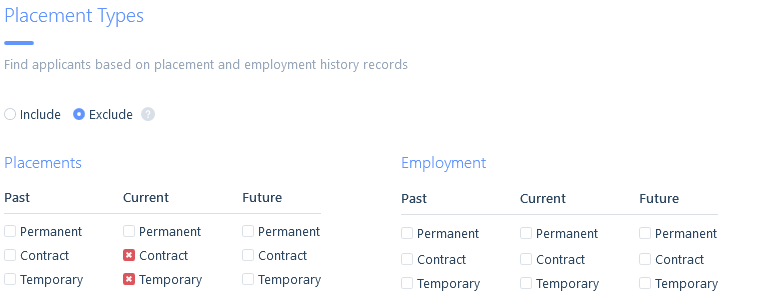
3. Exclude applicants restricted from Recruitment
4. Exclude applicants within their Rebate period (of a Fixed Fee placement)
5. Exclude applicants within the Grace period (of a Fixed Fee placement)
Grace periods are a way of superseding the rebate period with a longer protection period and can be set in the IMU.
Please see the Search Templates article for more information on creating your search templates.
Please see the Settings | General Settings article for more information on setting Grace Period.
Submissions
When submitting a CV to a contact/job via email by default itris will use the Attachment name as the Friendly Name, which is the name that shows for the attached CV in the email.

This means you have two options for renaming the CV when submitting to the contact:
Option One: You can change the Friendly Name in the New Submissions Window.
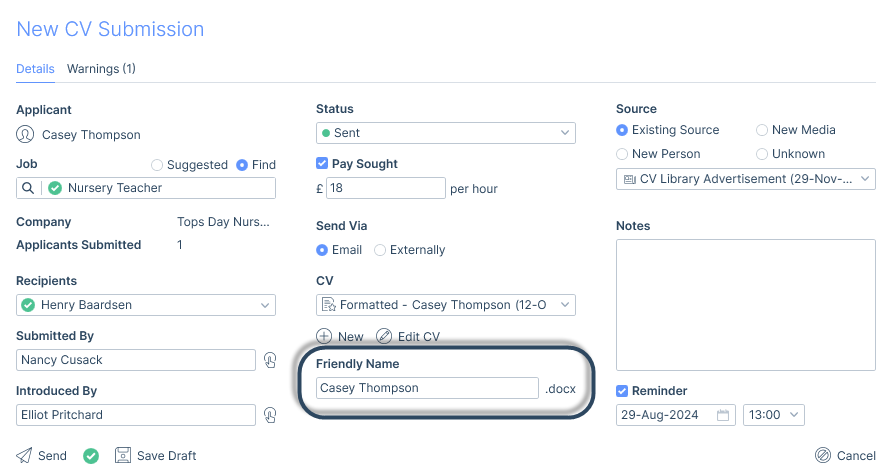
Option Two: You can change the name of the CV in the Applicants Attachments area by editing the attachment’s properties.

Yes, CVs must be marked as Draft in order to use the Multi Submit button within the Submissions Area.

Please see the Multiple CV Submissions article for more information.
Currently, you cannot drag and drop multiple applicants into the Submission lane in one go.
However, you can individually drag and drop them into the Submission lane, saving each one as Draft. You can then use the Multi Submit option from within the Submissions tab.
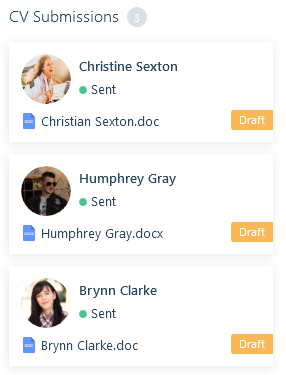
Please see the Multiple CV Submissions article for more information.
User Management
If you know your current password you can change it yourself in the itris 9 Launcher. Select the Change Password icon in the bottom right of the Launcher window

Please see the itris Launcher | Log in article for more information.
Alternatively, if you have forgotten your current password your internal database administrator will have access to the itris Management Utility (IMU) where they can edit your user account and change your password for you. Please see the User Management | Users article for more information.
User accounts are managed in the itris Management Utility (IMU), here users can have an End date added to their user account, after which date it will be inactive. Please see the User Management | Users article for more information.
If you want to keep their account live, but deny the user access you can change their password here too.
