

Starting Points & General Information
There are a number of places from which you can start creating an applicant record.
- You can choose to open the new applicant form using the option in the Main Menu.
- You can create new applicants via the New Record Hub, accessed via the Navigation bar (see the New Record Hub article).
- When in the process of creating any new record you can click the plus icon in the top right.
- If the applicant emails you their CV you can add them via your itris inbox, this is probably the most common option and is detailed below.
You won’t need a CV in order to add an applicant, and it can always be added later. If you are adding a CV at the point of creation, then unless switched off in the itris Management Utility (IMU) Settings area, itris will use Daxtra CV Parsing to populate many of the applicant record fields such as name, address, telephone, email and employment, saving you time from manual entry.
When creating the applicant from a CV a plain text version of this will be displayed on the CV tab and from here you can drag and drop (or copy and paste) data into the new applicant window as required. The CV text will be displayed on the applicant record once created and the original CV document saved as an attachment to the record.
There are three system mandatory fields when creating an applicant record as shown below, however, you can stipulate additional fields to be mandatory in the itris Management Utility (IMU), please see Settings | Mandatory Data article for more information.
- Name (First and Last, not Title)
- Gender (although can be set to “Unspecified”)
- Status
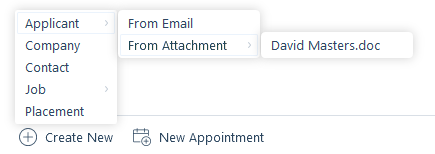
Creating an applicant from email
Once you locate the relevant email within your itris inbox you’ll have the Create New option, where you can choose to create the new applicant from the email body text or an attachment (e.g. CV).
When adding an applicant from an email, you will get an additional tab in the creation window called Email, from here you can drag and drop (or copy and paste) data into the new applicant window. This will be useful if the applicant has included a summary about themselves or information pertaining to their preferences, such as; salary sought or work location preference.

Creating an applicant from file
CVs can also be added from file by either dragging and dropping a CV file onto the CV tab or via the Load CV icon to find the CV.

From here you can choose to use a recently opened document, an email, or search your files for the CV.
Registering
When you have entered all the mandatory details and any additional information you will be able to register your applicant. If any fields require validation or mandatory fields have not been completed the Validation (exclamation mark) icon will show.
If itris recognises any potential duplicates it will let you know. See the section below for duplicates.

Profile Picture
You can store a profile picture of your applicant in itris. As mentioned below you can copy this from LinkedIn, additionally, if you have one on file you can upload it. If you don’t have a picture to use for your applicant the picture profile area will display their initials. The colour of the circle will be linked to the Status assigned to the applicant. See the article Data | List Items for more information.

Details
There are a plethora of data fields available in the details area, much of which can be used for searching, such as address, postal code and/or Address location (see the Location Assignment article for more information).
Next to the applicants name the magnifying glass icon will load a LinkedIn Search (for the applicant) in your default browser. You can then view their profile and use any relevant information to complete the applicant’s record. For example, you can drag over their LinkedIn picture to be their itris profile picture, drag and drop (or copy and paste) the LinkedIn About information into the Summary tab or simply cross-reference their employment history.

You can add the applicant’s date of birth to the record, which will appear in your Dashboard dependent on certain criteria (see the Dashboard | Active Business Intelligence article for more information). Additionally, you can add your applicant to one or more groups, including your favourites, set the applicant’s notice period and/or availability and add a quick note that displays on the applicant’s details tab.
The quick note is often used to display a short, but important/relevant note about the applicant that is useful or important to know, this is also a searchable field. If you have permissions to you are able to the quick note as a warning which will mark it as red on the record, you can find out more about permissions in the article User Management | Permissions.
Communications
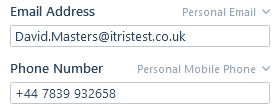
When adding in your applicant’s email and telephone numbers note the drop-down lists that enable you to specify which type of email/phone number you are adding. These lists are specified by you in the IMU, see the Data | Communications article for more information. The default type preset for each can also be adjusted in the IMU, see the Settings | General Settings article.
Once the record is created you can add further communications, see the Communication Assignment article for more information.
Source
You may want to record where an applicant has come from when creating them.
When adding a source to an applicant record, you can choose to assign either a Media or link a person record in itris (either applicant or contact), for example, when the applicant was obtained via a referral.
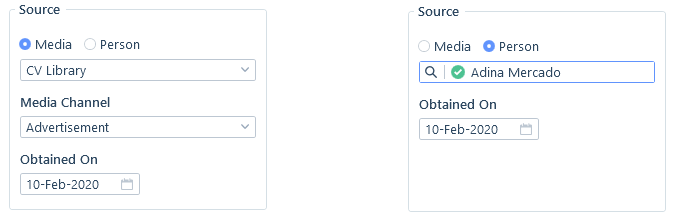
When assigning a Media you will also need to assign a Media Channel. Media Channels are how you can differentiate whether the applicant has applied to an advert that you have placed at a particular media, or whether you have obtained their CV from a CV repository from that media.
Adding a source will allow you to effectively analyse which avenues are the most effective and refine which you use accordingly.
For example, out of 100 applicants registered on the system, 60 may have come from LinkedIn Recruiter, and of those 60, 45 may have been placed generating income for your business. If this money generated from those applicants surpasses what is paid for subscriptions to LinkedIn Recruiter, the result would be a positive Return on Investment, whereas another avenue that has not provided many applicants you have placed might not be.
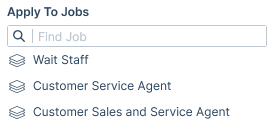
Apply to Jobs
If an applicant has applied to one or more jobs during the registration process you can link this at the point of creating the record. Once the New Applicant form is fully registered this information will show on the Applications tab of the applicant and associated job records.
Work Preferences
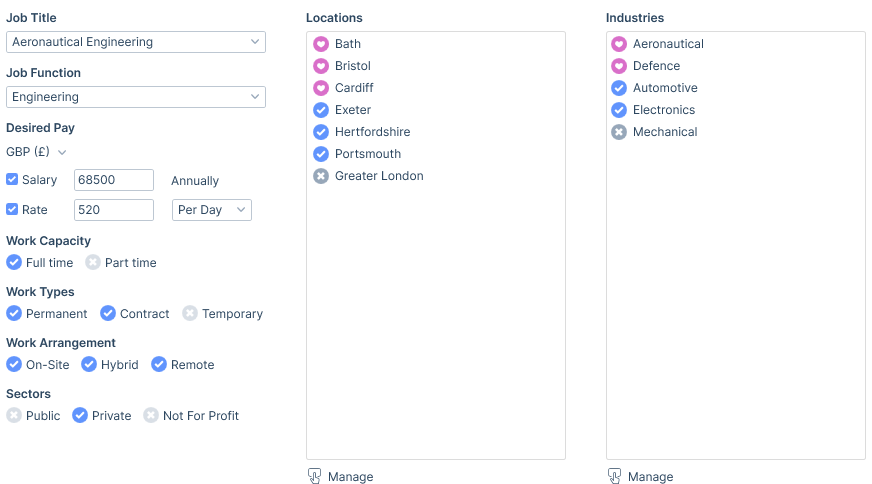
In addition to recording where your applicant is currently or has recently been working, or what they are/were paid for those roles, itris also has functionality for you to detail what they are looking for. Work Preferences record the details of the type of Role, Salary, Work Capacity (e.g. full or part time), Work Type (Permanent, Contract, Temp), Work arrangement (on-site, hybrid or remote) that the applicant desires and the locations they are willing to work in.
This information is also searchable, and of benefit beyond just searching what a candidate has done, because an applicant having worked in a particular role, location, industry etc before, does not necessarily mean that’s what they want to do going forward. Therefore, by adding in this information, and using it as search criteria you are more likely to find suitable applicants quickly.
For both locations & industry preferences, you have three levels: Ideal, Prepared to Work In and Not Prepared to Work In.
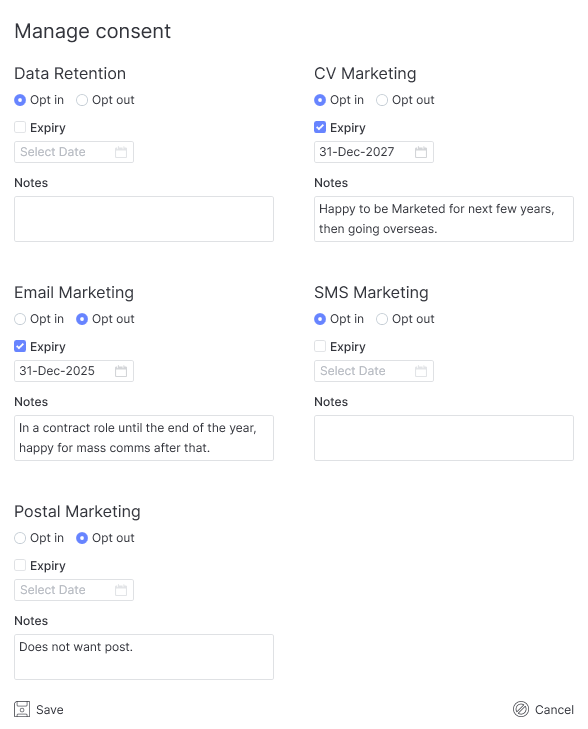
Consent
The defaults for Retention and Marketing Preferences are set in the IMU Settings | Personal Data area, however, you can change what is being set at the point of creating a new applicant record as well as once they are created.
Applicants who have opted out of email marketing will be excluded when adding email recipients in bulk (such as from a search or group). This does not restrict the ability to individually email the applicant (such as emailing directly from the applicant record). If the applicant has opted out of CV Marketing they will be flagged as invalid in the CV Marketing Hub.
For more information on Consent, please see the Retention Consent & Marketing Preferences article.
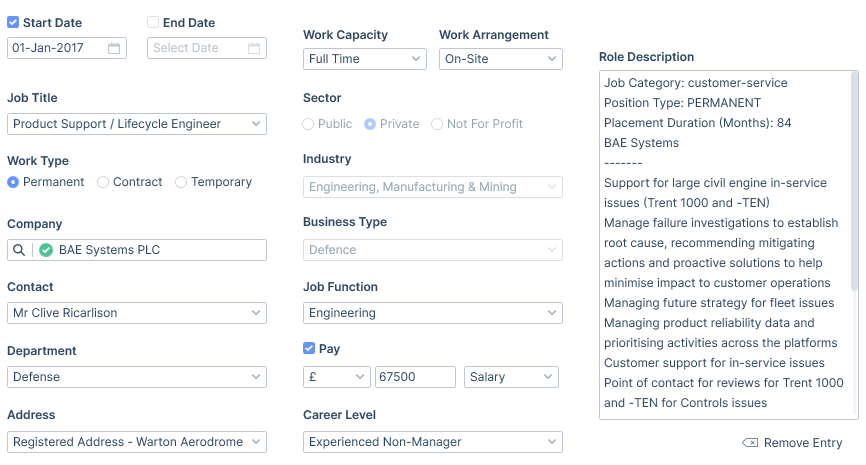
Employment
If you have Daxtra CV Parsing enabled then you will find previous/current employment added for you. You can add, edit or remove these as needed.
You are also able to link an employment entry to an existing company and contact in itris.
Employment is a searchable field, therefore you can search for an applicant who has worked at a particular company, industry or role etc before.
In turn, employment can be linked to references, see the References article for more information.
Keywords and Daxtra Keywords
Keywords are used simply to identify a specific record, for example, you may use keywords to note specific skills or attributes. These can then be searched on, providing the facility to find records tagged with the applicable keywords.
The creation and management of keywords occur in the itris Management Utility (IMU), as this will allow you to centrally control the keyword data in itris.
See the Keyword Assignment article for more information on manually assigning keywords, ratings and Lifetimes/Obtained on.
If you have Daxtra Keyword Parsing enabled, this will look to assign keywords to the record for you, please see the Daxtra CV Parsing article for full details.
Custom Fields
A Custom Field is a means for your organisation to create fields and record data that itris doesn’t directly accommodate.
Custom Fields allows you to customise itris to work alongside your business and workflow, additionally, they are searchable fields.
Custom fields are created and managed via the itris Management Utility (IMU) Data area.
Please see the Custom Field Assignment article for more information.
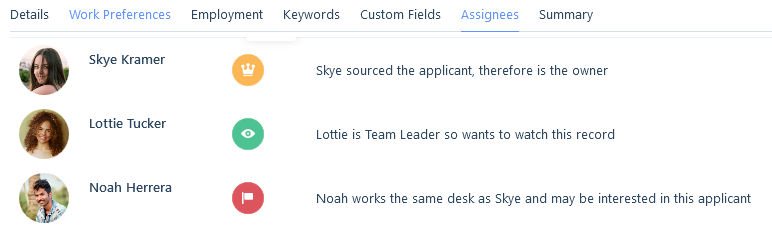
Assignees
Assignees are used to associate a user or users with a record as either an Owner, Watcher or FAO (for the attention of), and are searchable. See the Assignees article for more information.
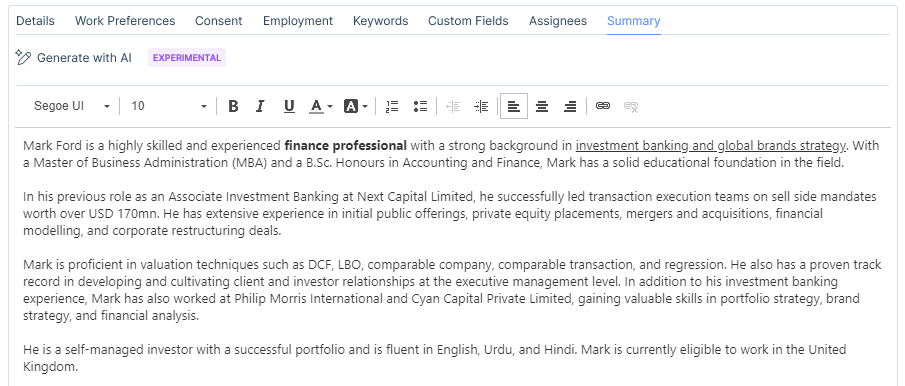
Summary
The summary area is a text area with formatting options and is Full Text (Boolean) searchable. The Summary area is also available as an applicant merge field, to use in Word and/or Email templates.
There already exist areas in itris where you can skill code a person, or note down their job title or what they are looking for, so you can use this area perhaps for less tangible aspects of the applicant. For example any of the below, or a combination of:
Generate with AI, creates a summary using the information available in the applicant’s CV, particularly useful when using the Summary merge field in templates. See the following article on how to set up this feature: Integrations | OpenAI. If you will be adding additional information to the generated summary, please ensure you generate the summary first.
Copy (or Drag and Drop) the person’s About section from their LinkedIn profile
Copy (or Drag and Drop) the person’s personal summary from their CV
Manually record what the person was like, how they interview, what they do in their spare time, their likes and dislikes, etc. to help you build a fuller picture of that person, whether it’s to build rapport with them or promote them for a role.
Duplicate Records
In databases, it is inevitable that somebody will try to create a duplicate record. To avoid this possibility, when adding an applicant record the following fields will be used to check for duplicate records
- First and Last names
- Email Address
- Phone Number
When adding in a possible duplicate CV the duplicate semi-modal will open, listing any possible duplicates on the left with their record card on the right to help you determine if it is a duplicate. Using Go To, will take you to the possible duplicate record, asking you first if you wish to discard the new applicant entry.
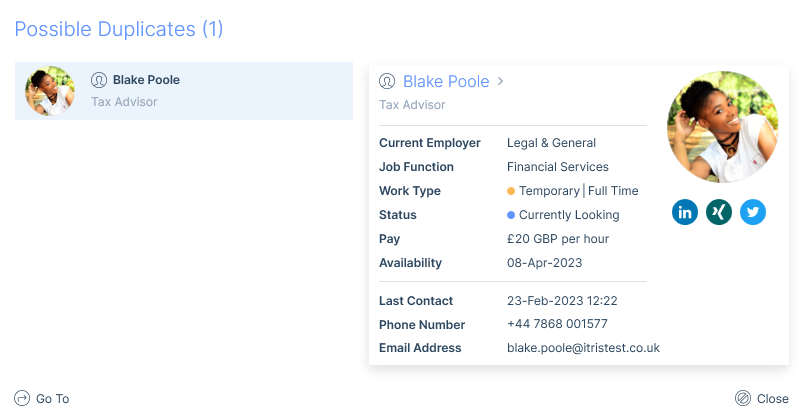
If you close the duplicate semi-modal the Possible Duplicates button will remain at the foot of the window, indicating the number of possible duplicates. You can return to the duplicate semi-modal at any time by clicking this option.

The duplicates could be applicant as well as contact records and these can be differentiated by the applicant or contact icon prior to their name. When the duplicate is a contact record, the applicant record being created can be linked to the record via Link Record, please see the article Linking Applicant & Contact for further information.
Should you choose to register the record you will be asked to confirm it is not a duplicate before continuing. However, if your administrator has chosen to prevent applicants with duplicate email addresses from being created and the email address detailed is assigned to another applicant record you will not be able to proceed and the validation icon will be present on the email field. Please see the Settings | General Settings article for more information on this setting.
