
Introduction
All of the submission stages in the Submissions area are covered in this article apart from Marketed. Please see the CV Marketing Hub article for more information on this submission stage.
You may also find it useful to refer to the Job Activity article alongside this article.
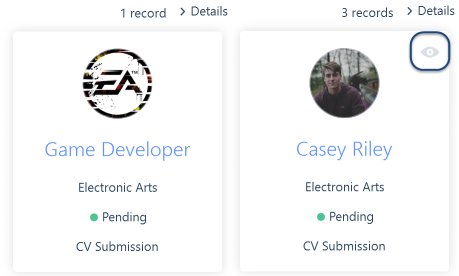
The Details option will display the record card associated with the submission from the perspective of that record type. For example, the below images show from an applicant and job perspective respectively. You will have the ability to pop open the applicant record card using the view icon located in the top right of the applicant’s details (shown below). Giving you easy access to further information about that applicant including their contact details.
Each tab will have various action buttons relating to activity at that submission stage such as sending interview confirmations, see below for specific details. Additionally, each will have the option to convert the list from the tab into a Focused Search using the Search button, please see the Converting & Focused Searches article for more information.
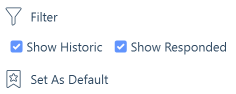
Filter & Sort
There are filter options on each stage to help you locate the relevant entry quickly, you can even set defaults, for example on the Applications tab:
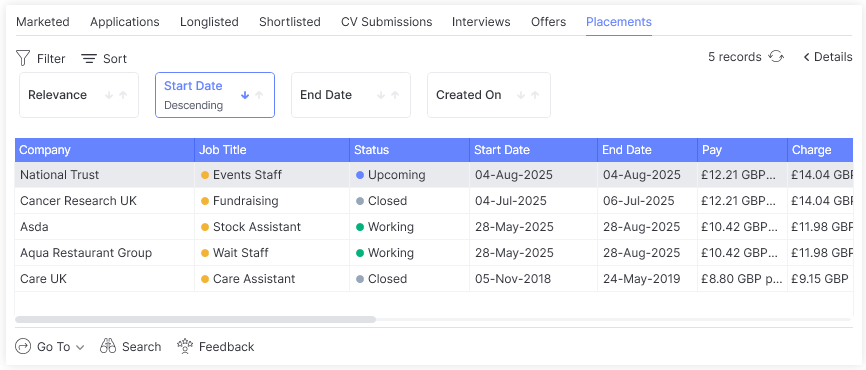
Sort orders will also be appropriate for each tab. Each one will allow you to sort by Relevance and Created On date (defaulted to descending). Relevance essentially shows active submissions/placements still in play. Additionally, you will also be able to sort of the following:
- Interviews tab - Interview Date
- Offers tab - Offered On Date
- Placements tab - Start Date, End Date, Created On
Submission Workflow
You can choose to start the submission process at any level using the New button on the relevant tab or the options in the applicant/company/contact/job navigation bar where available.

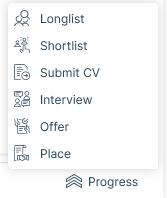
Applicants are progressed through the submission stages using the Progress button. You can progress an applicant to any level (as long as it is further along the stages, not backwards), you don’t need to hit each stage of the workflow.
At each stage of the submission process, you can set yourself a reminder, to follow up on, for example. Reminders will appear in your Side Bar, please see the Sidebar article for more information.
From the Shortlist stage onwards you will be able to view any Warnings relevant to that submission. Please see the Submission Warnings article for more information.
Additionally, you can set an Introduced by, for example, adding in the Resourcer who found the applicant.
At Submit CV, Interview and Offer stage you have options for sending emails, relevant to that submission stage. Please see the Templates | Email Templates (Global) and Personal Email Templates articles for more information on further improving efficiency in this area.
Linking Submissions to Applicant & Job Records
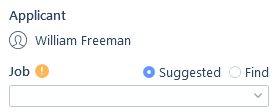
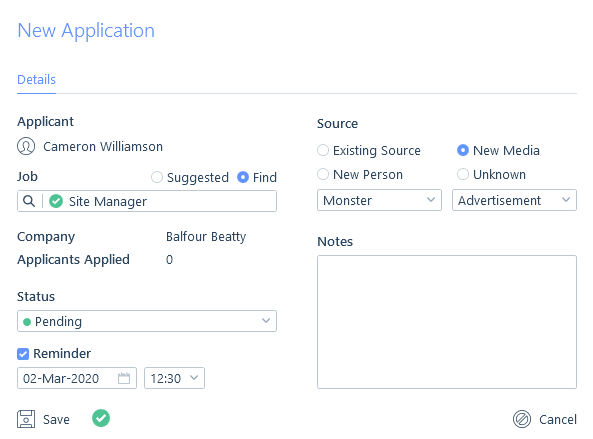
When making a submission you will need to link the submission to both the applicant and the job.
Depending on where you start the submission process from, one of these will already be identified, and you will need to link to the other. For example, if you start the submission process from the applicant record you will need to link the submission to a job.
There are two ways to link the records, either via the Suggested List or Record Find.
Suggested Lists
Job Record
If you are starting the submission process from a Job record the Suggested list will show all those applicants recently opened by you.
Company or Contact Record
When starting the submission process from a Company or Contact record you will see live jobs (created within the last 6 months) for that Company/Contact.
Applicant Record
When starting the submission process (including placement) from an applicant records the Suggested list will show all live jobs (created within the last 6 months) that are any of the following:
- Jobs in which the applicant already has a live submission
- Jobs Obtained by you
- Jobs where you are the Owner Assignee
- Jobs in your recently opened list
Record Find and Advanced Record Find
Using Find record you can search by the record ID number, applicant name or job title as appropriate.
However, there may be times when you search for a record and you’re unsure if the correct one appears in the record find list. In these cases, you can use the Advanced Record Find. With Advanced Record Find you can perform an advanced find for such scenarios which will provide some more in-depth criteria as well as a record card, so you can be sure that you’ve found the record you were looking for before navigating to it. Please see the Record Find Control article for more details on using the Advanced Find.
Source
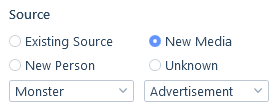
At any stage of the submission process (with the exception of Place) you can change or assign a source, such as choosing between existing assigned sources from the applicant record or assigning a new person or a new media.
By default, the most recent existing source assigned to the applicant record, where applicable will be assigned as the source. For example, originally the applicant may have come from LinkedIn and been added to itris, but they then saw an advert on Monster for a particular job and applied for that job.
You will want to record that source to help with the accuracy of reporting on each media source’s performance. This will then be attached to the workflow for that particular submission. Additionally, it will populate the applicant’s Sources tab in the information area. See the Sources Assignment article for more information.
Sources can be reported on to track Return on Investment via the Sources Report (see the Sources Report article).
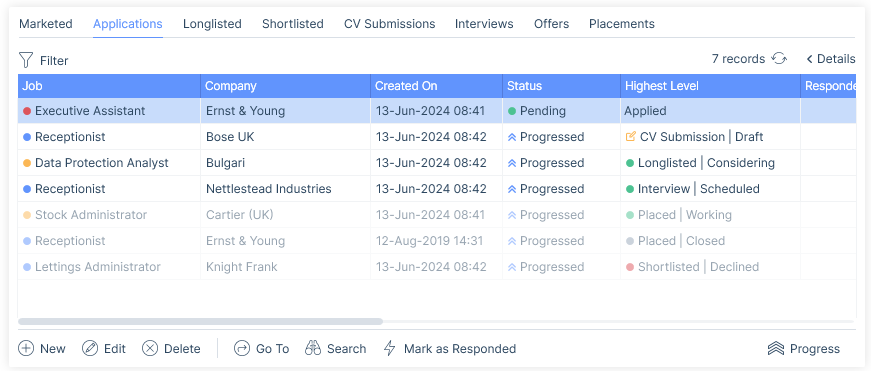
Applications
The Applications submission level is visible on the applicant and job records only. Depending on the record type you are on, it either shows you all the jobs the applicant has been marked as applied to or all the applicants that have been marked as applying to that specific job.
Applications is the only stage that you can not progress to as it will only ever be the first stage.
Under the applications tab, you can keep track of whose application you’ve responded to for example, if you have thanked them for their application, to tell them you are progressing them or not etc.
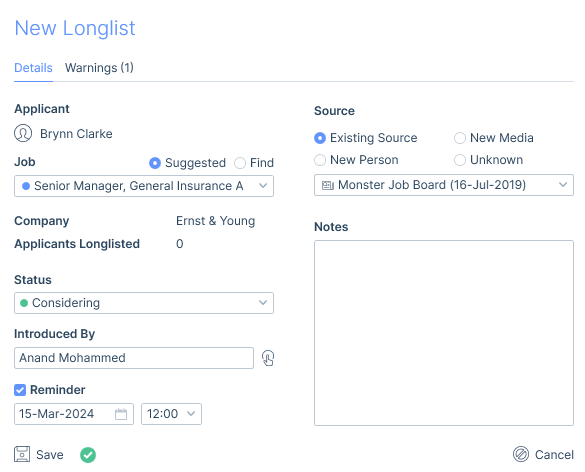
Longlisted
The Longlisted submission level is visible on the applicant and job records only. Depending on the record type you are on, it either shows you all the jobs the applicant has been Longlisted to or all the applicants that have been Longlisted to that specific job.
Shortlisted
The Shortlisted submission level is visible on the applicant and job records only. Depending on the record type you are on, it either shows you all the jobs the applicant has been shortlisted to or all the applicants that have been shortlisted to that specific job.
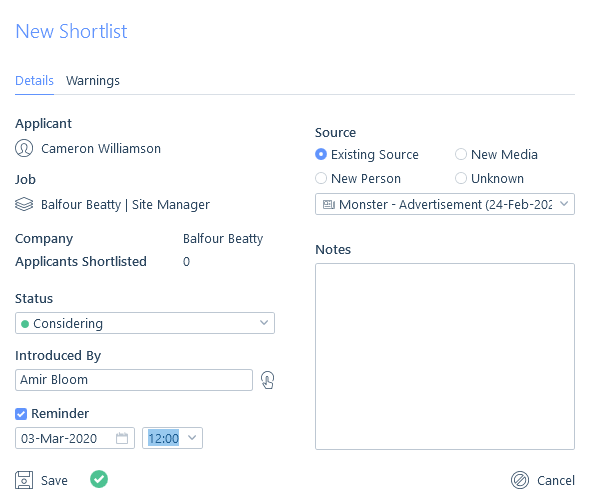
From the job record you also have the option to place multiple applicants into the job. Please see the Multiple Applicant Placements article for more information.

CV Submissions
The CV Submissions level is visible on all record types and will display entries as relevant for that record type.
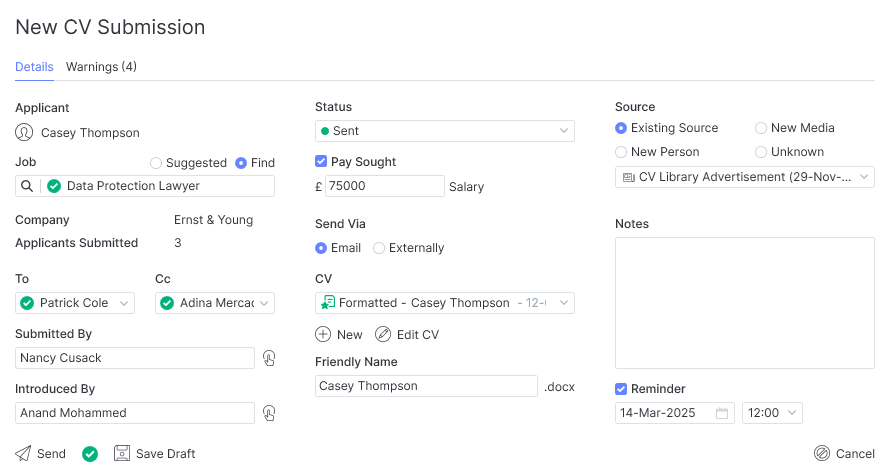
The default To and Cc recipients will be those selected on the Recipients tab of the Job Record (see the Job Record article for more details), but can be edited in this form.
At this stage you can add in further information regarding pay sought, source & notes.
Once added, the CV can be edited too, this will create and attach a new Submission CV to the applicants record (attachments tab).
Additionally, you can choose to send that CV by email, or mark as sent externally, for example when uploading to a client’s web portal.
When submitting an applicant’s CV, if the CV send limit, or submission deadline has passed you will get a warning in the warnings tab, see the Submission Warnings article for more information.
If you wish to send more than the one CV you’ll need to first save them as Draft (see below).
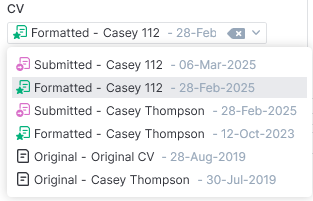
CV Selection Drop Down
You can choose which of the applicant’s current CVs to send via the CV drop down menu. This different types of available CVs are depicted by the different icons for ease of reference. The following types of CV are available for selection:
- Original (identified by the black icon)
- Formatted (identified by the green icon)
- Previously submitted (identified by the pink icon)
New CV
Alternatively via the New button a CV saved outside of itris or within your recent emails can be used, or via the From Template tab a new formatted CV can be created. Please see the Word Templates article for details on how to create a formatted CV and the CVs | Original & Formatted for how to use the Templates.

Data Access Groups
CVs are essentially attachments and therefore may have Data Access Groups (DAGs) applied to them. DAGs restrict users’ views and manage access to attachments. Therefore, when selecting CVs for Submissions you will only see CVs you have access to unless the attachment currently selected is hidden from you (e.g. it’s the most recent formatted CV), it will still show it as selected and you will need to choose another CV.
Please see the User Management | Data Access Groups and Attachments articles for further information.
Multiple Submit
In order to submit more than one CV to a job via an email, you must first complete the New CV Submission form (as this information is unique per applicant for example, the source, pay sought etc) and Save as Draft. You can also submit CVs to draft from a search or record group.
From the submissions tab on the Job you can then Multi Submit.

As you might not want to send everybody that’s been saved as a Draft, you can choose which applicants to send. Here you will see if there are any warnings against the applicants.
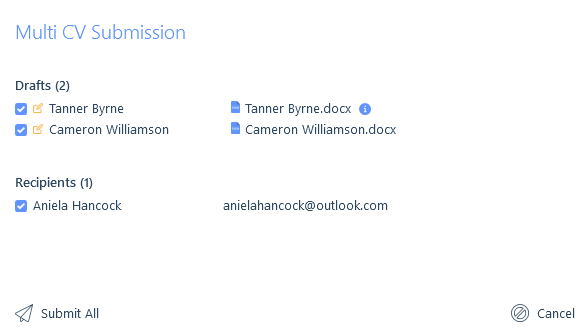
Please note, that you won’t be able to use CV Submission email templates when using multi Submit due to the logic behind merge fields, and these values being different per applicant being submitted. However, you could create a general (global) email template from within the itris Management Utility as this won’t contain merge fields.
See the Multiple CV Submission article for more details.
Interviews
The Interviews level is visible on all record types and will display entries as relevant for that record type.
Interviewers will be automatically selected depending on your settings on the Recipients tab of the job record (see the Job Record article for more details), but can be edited on a per interview basis is required. Those selected will all be included as To recipients on any Interview email sent to contacts.
Additionally, you can add in the interview address and create reminders for both before and after the interview. This way you can be reminded to check in with the applicant before they go to make sure they are prepared, and then be reminded to follow up with the interviewer and applicant after to get their feedback.
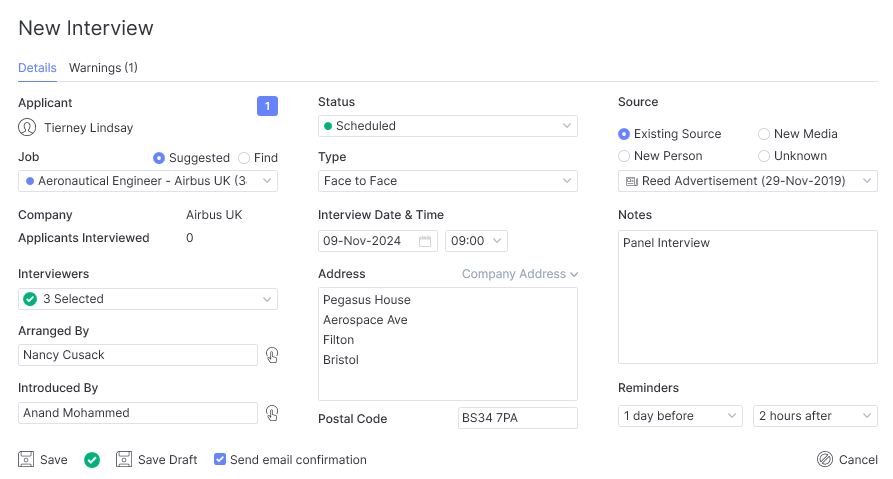
There is an option to automatically initiate the process to send email confirmations for the Interview. You can set this to be ticked by default in your itris Preferences, please see the itris Preferences for more details.
With this in mind, Interviews is an area you may wish to create email templates for. There is more information in the Templates | Email Templates (Global) and Personal Email Templates articles for creating email templates, however, one particular merge field that you may find useful for these templates is the ‘Directions to Interview’ merge field which produces a hyperlink once the email is merged and sent. This hyperlink displays possible routes on google maps from the applicant’s default address to the interview address.

There is functionality to add in further interviews and record feedback for each interview from both the applicant and contact, which will then be listed on each other’s statistics tab. Please see the Feedback | Interviews & Placements and Statistics | Applicant & Contact articles for more information.
Offers
The Offers level is visible on all record types and will display entries as relevant for that record type.
When creating offers (there can be more than one per applicant, per job) you can add in the pay being offered, expiry and reminder dates and even attach documents.
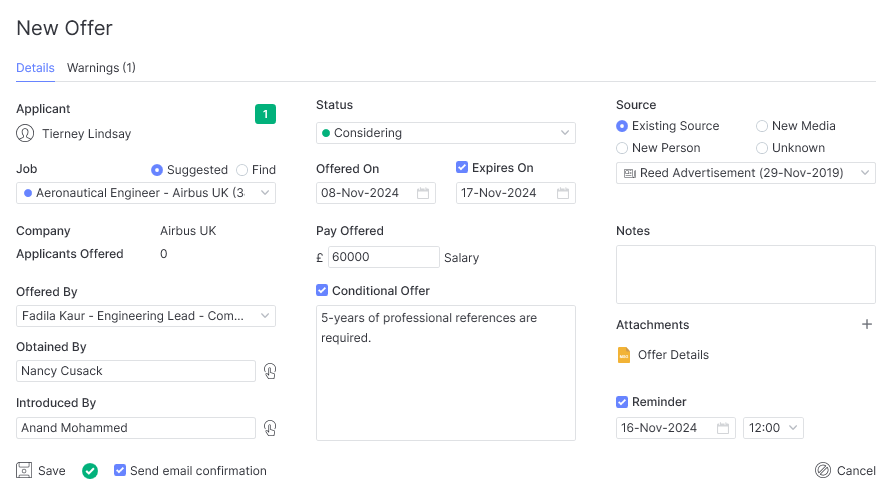
As with Interviews, there is an option to automatically initiate the process to send an email confirmation of the Offer. You can set this to be ticked by default in your itris Preferences, please see the itris Preferences for more details.
Again this is another area that email templates are useful, you can find more information in the Templates | Email Templates (Global) and Personal Email Templates articles.
Once the offer is saved there is the option to create an Improved offer.

Placements
Finally, you can progress the applicant to be placed in the job.
Please see the New Placement article for more information.